14:
While building an extreme feedback device utilizing the ESP8266 and a bunch of WS2812B LEDs I missed some detailed information about the GPIO output performance of the ESP8266. This was a more general demand – but I ended up with my own WS2812 driver. And it was fun to use NOPs to achieve a nearly perfect timing (… cause I still remember the good old days when we used NOPs to create awesome rasterbars on the C64).
setup / basics
The XTENSA lx106 runs at 80 Mhz and has interrupts and watchdog disabled during measurement (see below).
Excerp from https://github.com/esp8266/esp8266-wiki/wiki/gpio-registers – I/O addresses used to control the GPIO hardware:
0x60000304 - set GPIO pin HIGH
0x60000308 - set GPIO pin LOW
0x60000310 - set GPIO pin direction output
0x60000314 - set GPIO pin direction input
Xtensa calling convention
*** this part is just here for completeness ***
The lx106 used in the ESP8266 implements the CALL0 ABI offering a 16-entry register file (see Diamond Standard 106Micro Controller brochure). By this we can apply the calling convention outlined in the Xtensa ISA reference manual, chapter 8.1.2 CALL0 Register Usage and Stack Layout:
a0 - return address
a1 - stack pointer
a2..a7 - arguments (foo(int16 a,long long b) -> a2 = a, a4/5 = b), if sizefof(args) > 6 words -> use stack
a8 - static chain (for nested functions: contains the ptr to the stack frame of the caller)
a12..a15 - callee saved (registers containing values that must be preserved for the caller)
a15 - optional stack frame ptr
Return values are placed in AR2..AR5. If the offered space (four words) does not meet the required amount of memory to return the result, the stack is used.
disabling interrupts
According to the Xtensa ISA (Instruction Set Architecture) manual the Xtensa processor cores supporting up to 15 interrupt levels – but the used lx106 core only supports two of them (level 1 and 2). The current interrupt level is stored in CINTLEVEL (4 bit, part of the PS register, see page 88). Only interrupts at levels above CINTLEVEL are enabled.
In esp_iot_sdk_v1.0.0/include/osapi.h the macros os_intr_lock() and os_intr_unlock() are defined to use the ets_intr_lock() and ets_intr_unlock() functions offered by the ROM. The disassembly reveals nothing special:
disassembly – ets_intr_lock() and ets_intr_unlock():
ets_intr_lock():
40000f74:  006320      rsil  a2, 3           // a2 = old level, set CINTLEVEL to 3 -> disable all interrupt levels supported by the lx106
40000f77:  fffe31      l32r  a3, 0x40000f70  // a3 = *mem(0x40000f70) = 0x3fffcc0
40000f7a:  0329        s32i.n  a2, a3, 0       // mem(a3) = a2 -> mem(0x3fffdcc0) = old level -> saved for what?
40000f7c:  f00d        ret.n

ets_intr_unlock():
40000f80:  006020      rsil  a2, 0           //enable all interrupt levels
40000f83:  f00d        ret.n
To avoid the overhead of the function call and the unneeded store operation the following macros to enable / disable interrupts can be used:
macros for disabling/enabling interrupts:
#define XT_CLI __asm__("rsil a2, 3");
#define XT_STI __asm__("rsil a2, 0");
NOTE: the ability to run rsil from user code without triggering a PriviledgedInstruction exception implies that all code is run on ring0. This matches the information given here https://github.com/esp8266/esp8266-wiki/wiki/Boot-Process
the watchdog
Just keep it disabled. I run into a lot of trouble with it – seemed the wdt_feed() didn’t work for me.
…and its not (well) documented at all.
Some pieces of information I found in the net:
gpio_output_set(uint32 set_mask, uint32 clear_mask, uint32 enable_mask, uint32 disable_mask)
declared in: esp_iot_sdk_v1.0.0/include/gpio.h
defined in: ROM (eagle.rom.addr.v6.ld -> PROVIDE ( gpio_output_set = 0x40004cd0 ))
C example:
gpio_output_set(BIT2, 0, BIT2, 0);  // HIGH
gpio_output_set(0, BIT2, BIT2, 0);  // LOW
gpio_output_set(BIT2, 0, BIT2, 0);  // HIGH
gpio_output_set(0, BIT2, BIT2, 0);  // LOW
disassembly – call to gpio_output_set(BIT2, 0, BIT2, 0):
40243247:       420c            movi.n  a2, 4                                     // a2 = 4
40243249:       030c            movi.n  a3, 0                                     // a3 = 0
4024324b:       024d            mov.n   a4, a2                                    // a4 = 4
4024324d:       205330          or      a5, a3, a3                                // a5 = 0
40243250:       f79001          l32r    a0, 40241090 <system_relative_time+0x18>  // a0 = *mem(40241090) = 0x40004cd0
40243253:       0000c0          callx0  a0                                        // call 0x40004cd0 - gpio_output_set
disassembly – gpio_output_set (thanks to By0ff for the ROM dump):
> xtensa-lx106-elf-objdump -m xtensa -EL  -b binary --adjust-vma=0x40000000 --start-address=0x40004cd0 --stop-address=0x40004ced -D 0x4000000-0x4011000/0x4000000-0x4011000.bin

0x4000000-0x4011000/0x4000000-0x4011000.bin:     file format binary

Disassembly of the .data section:

40004cd0 <.data+0x4cd0>:
40004cd0:       f0bd61          l32r    a6, 0x40000fc4  // a6 = *mem(0x40000fc4) = 0x60000200
40004cd3:       0020c0          memw                    // finish all mem operations before next op
40004cd6:       416622          s32i    a2, a6, 0x104   // mem(a6 + 0x104) = a2 -> mem(0x60000304) = 4 (SET)
40004cd9:       0020c0          memw
40004cdc:       426632          s32i    a3, a6, 0x108   // mem(a6 + 0x108) = a3 -> mem(0x60000308) = 0 (CLR)
40004cdf:       0020c0          memw
40004ce2:       446642          s32i    a4, a6, 0x110   // mem(a6 + 0x110) = a4 -> mem(0x60000310) = 4 (DIR -> OUTPUT)
40004ce5:       0020c0          memw
40004ce8:       456652          s32i    a5, a6, 0x114   // mem(a6 + 0x114) = a5 -> mem(0x60000314) = 0 (DIR -> INPUT)
40004ceb:       f00d            ret.n                   // return to the caller

> od -A x -j 0xfc4 -N 4 -x 0x4000000-0x4011000/0x4000000-0x4011000.bin
000fc4 0200 6000            // *mem(0x40000fc4) = 0x60000200
000fc8
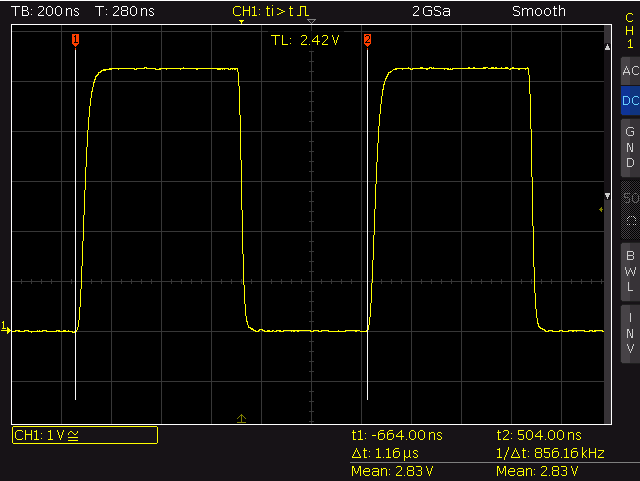
gpio_output_set()
The whole cycle of a HIGH-RISE/LOW/HIGH-RISE transition takes 1160 nano seconds – the execution of one call to gpio_output_set() takes ~580ns (~46 cycles@80Mhz). Since the clear operation is executed after the set operation (see the code above) the LOW period is slightly shorter then the HIGH period (HIGH: 675ns, LOW: 485ns). By setting an initial LOW GPIO to HIGH and LOW in the same command a short pulse of 88 nano seconds length (~7 cycles) is created.
The macro GPIO_OUTPUT_SET(gpio_no, bit_value) – defined in esp_iot_sdk_v1.0.0/include/gpio.h – is just a wrapper for gpio_output_set():
#define GPIO_OUTPUT_SET(gpio_no, bit_value) \
    gpio_output_set(bit_value<<gpio_no, ((~bit_value)&0x01)<<gpio_no, 1<<gpio_no,0)
WRITE_PERI_REG(addr, val)
Macro defined in esp_iot_sdk_v1.0.0/include/eagle_soc.h:
#define WRITE_PERI_REG(addr, val) (*((volatile uint32_t *)ETS_UNCACHED_ADDR(addr))) = (uint32_t)(val)
It boils down to the following assembly instructions:
4024323a:       080000          excw
4024323d:       600003          excw                // --> *mem(4024323c) -> 0x60000308

40243240:       000304          excw
40243243:       f03d60          subx8   a3, a13, a6 // --> *mem(40243240) -> 0x60000304

// set
40243252:       fffb21          l32r    a2, 40243240 <eagle_lwip_getif+0x28>    // a2 = 0x60000304
40243255:       230c            movi.n  a3, 4                                   // a3 = 4
40243257:       0020c0          memw
4024325a:       0239            s32i.n  a3, a2, 0                               // mem(a2 + 0) = a3 -> mem(0x60000308) = 4

// clear
4024325c:       fff821          l32r    a2, 4024323c <eagle_lwip_getif+0x24>    // a2 = 0x60000308
4024325f:       430c            movi.n  a3, 4                                   // a3 = 4
40243261:       0020c0          memw
40243264:       0239            s32i.n  a3, a2, 0                               // mem(a2 + 0) = a3 -> mem(0x60000308) = 4
To avoid optimization by the compiler I used the following hand crafted code for the measurement:
...
__asm__("movi    a2, 0x60000304  \n" // will be converted to literal load - l32r    a2, 40243240 <eagle_lwip_getif+0x28>
    "movi.n  a3, 4       \n"
    "memw           \n"
    "s32i.n  a3, a2, 0     \n"
    );

__asm__("movi    a2, 0x60000308  \n"
    "movi.n  a3, 4       \n"
    "memw           \n"
    "s32i.n  a3, a2, 0     \n"
    );
...
The disassembly shows that the movi is converted to a literal load (as expected):
...
40243248:       fffd21          l32r    a2, 4024323c <eagle_lwip_getif+0x24>
4024324b:       430c            movi.n  a3, 4
4024324d:       0020c0          memw
40243250:       0239            s32i.n  a3, a2, 0
40243252:       fffb21          l32r    a2, 40243240 <eagle_lwip_getif+0x28>
40243255:       430c            movi.n  a3, 4
40243257:       0020c0          memw
4024325a:       0239            s32i.n  a3, a2, 0
...
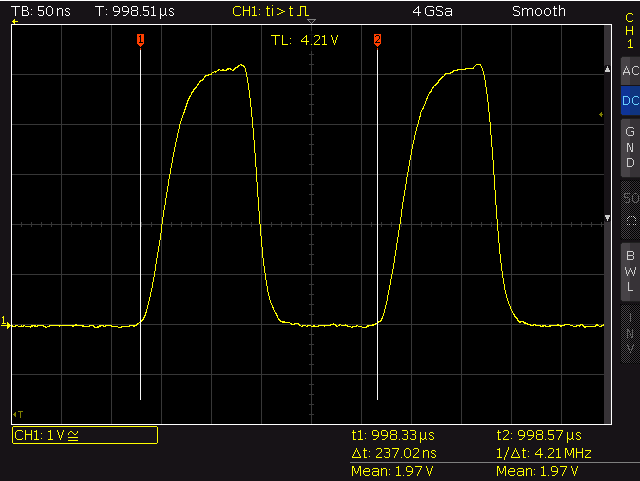
write_peri_reg()
The whole cyle of a HIGH-RISE/LOW/HIGH-RISE transition takes 237ns nano seconds with a HIGH-period
of 100 ns (8 cycles) and a LOW-period of 137 ns (11 cycles – the HIGH-period is three cycles shorter
then the LOW period – maybe caused by one additional instruction fetch).
By avoiding the mov and removing the memw operations I was able to generate pulses with a period time of 150ns (12 cycles, HIGH: ~52ns, LOW: ~98ns).
__asm__("movi    a2, 0x60000304  \n"
    "movi    a4, 0x60000308  \n"
    "movi.n  a3, 4       \n"  // GPIO2
    "memw           \n"
    "s32i.n  a3, a2, 0     \n"
    "s32i.n  a3, a4, 0     \n"
    "s32i.n  a3, a2, 0     \n"
    "s32i.n  a3, a4, 0     \n"
    "s32i.n  a3, a2, 0     \n"
    "s32i.n  a3, a4, 0     \n"
  );
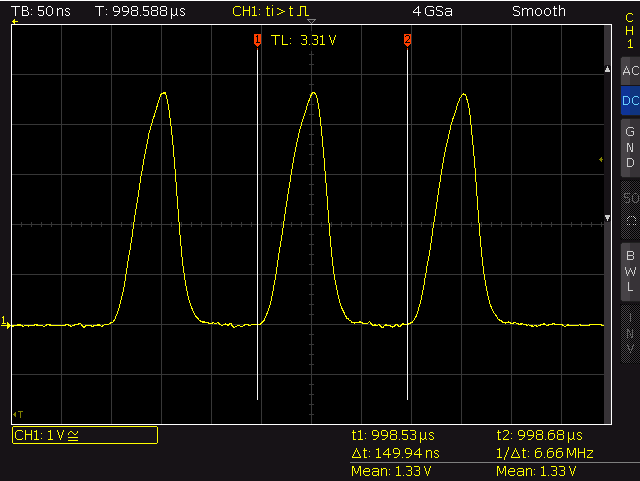
fastest – T: ~150ns
WS2812B timing
…this was the starting point that forced me to have a deeper look into that topic. There are already some implementations for controlling the WS2812B. They work – just use them. This part is for fun and education … ahh, lets do it in plain assembly.
static inline void WS2812B_SEND_1(int port)
{
  //800ns HIGH & 450ns LOW
  __asm__ volatile ("movi    a2, 0x60000304  \n"
            "movi    a3, 0x60000308  \n"
            "movi    a4, %0      \n"
            "s32i    a4, a2, 0     \n"
            "memw            \n"
            "movi    a5, 14         \n"
            "3:            \n"
            "addi    a5, a5, -1    \n"
            "bnez    a5, 3b      \n"
            "nop.n           \n"
            "nop.n           \n"
            "nop.n           \n"
            "nop.n           \n"
            "nop.n           \n"
            "s32i    a4, a3, 0     \n"
            "memw            \n"
            "movi    a5, 2         \n"
            "4:            \n"
            "addi    a5, a5, -1    \n"
            "bnez    a5, 4b      \n"
           :: "g" (port)
           : "a2", "a3", "a4", "a5"
           );
}
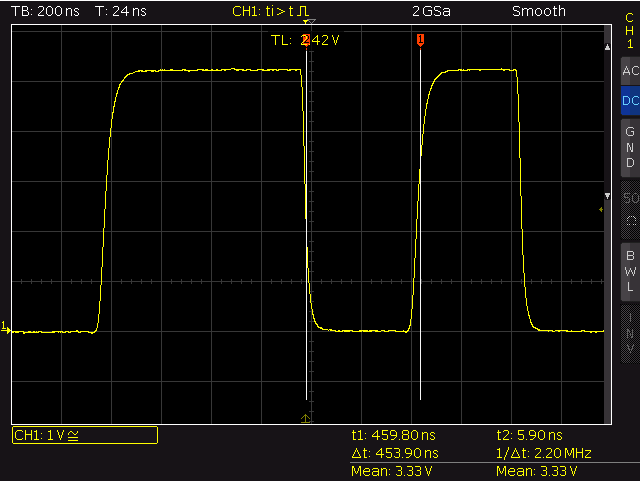
ws2812b – send logical 1
SEND_1_HIGH: 796ns
SEND_1_LOW:  454ns
static inline void WS2812B_SEND_0(int port)
{
  //400ns HIGH & 850ns LOW
  __asm__ volatile ("movi    a2, 0x60000304  \n"
            "movi    a3, 0x60000308  \n"
            "movi    a4, %0      \n"
            "s32i    a4, a2, 0     \n"
            "memw            \n"
            "movi    a5, 7         \n"
            "1:            \n"
            "addi    a5, a5, -1    \n"
            "bnez    a5, 1b      \n"
            "nop.n           \n"
            "s32i    a4, a3, 0     \n"
            "memw            \n"
            "movi    a5, 10         \n"
            "2:            \n"
            "addi    a5, a5, -1    \n"
            "bnez    a5, 2b      \n"
            "nop.n           \n"
            "nop.n           \n"
              "nop.n           \n"
           :: "g" (port)
           : "a2", "a3", "a4", "a5"
           );
}
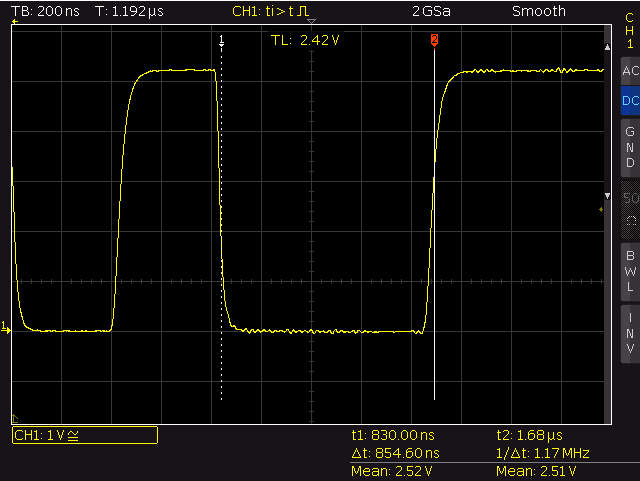
ws2812b – send logical 0
SEND_0_HIGH: 397ns
SEND_0_LOW: 855ns
experiences
- Add a ~400 ohm resistor into the WS2812 data input line to avoid oscillation caused by reflections of the input of the first LED.
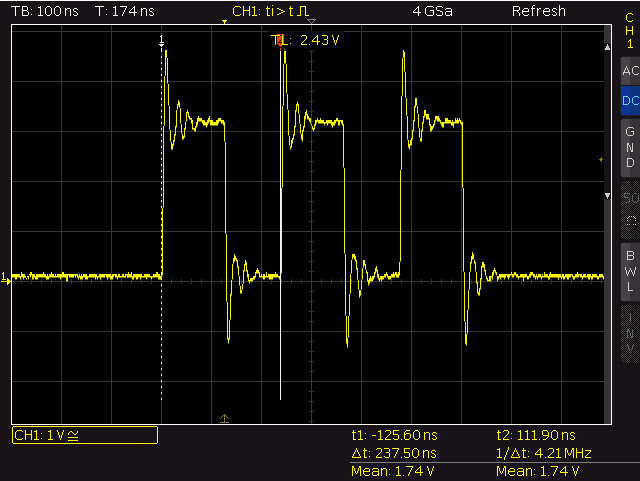
write_peri_reg() – no resistor
- Use decoupling capacitors – without I got strange noise on the power supply line.
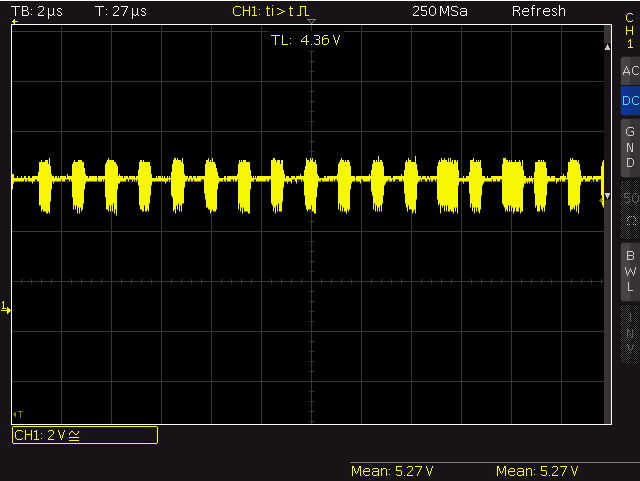
pwr supply – noise bursts
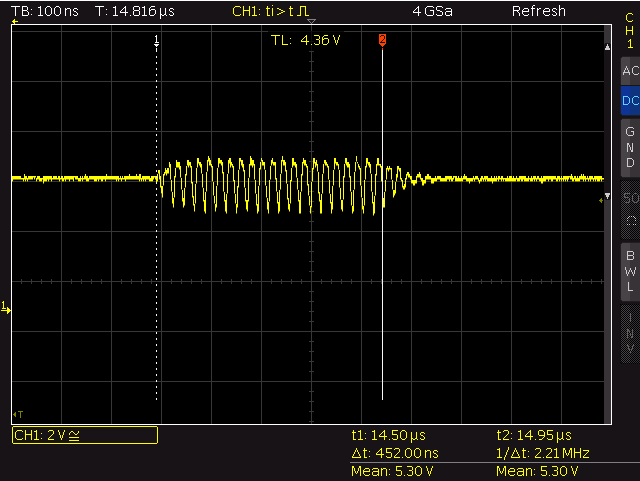
pwr supply – single bursts
- Ensure the WS2812 data line uses a proper signal level. According to the data sheet DATA_IN is treated as HIGH above 3.5V (0.7*Vdd) and LOW below 1.5V (0.3*Vdd)). The Vhigh of 3.3V offered by the ESP9266 is not enough for the WS2812B to be detected as a clean HIGH signal (I got some strange flickers – after adding a 4050 as level shifter everything was fine).
- Disable interrupts during bit-banging the WS2812. Avoid disabled interrupts for more then 10ms or wireless connections will act wired. Keeping that in mind you will be able to write ~300 LEDs at once (1250ns per bit, 8 bit per color, 3 colors = 30us, internal overhead when switching to the next pixel = 225ns, keep 50us between each write for reset condition). If you need to run the code from above from flash check the timing using an oscilloscope. I have seen NOPs taking more then one cycle…
- Wear sunscreen.
Useful links
posted by
hecke on 2015.02.22, under
sql22:
All recent versions of MS SQL are able to generate the XML representation of a SQL query result on the fly:
>select * from dbo.foo
id  foo
1  dead
2  beef

>select * from dbo.foo for XML RAW, ELEMENTS

<row>
  <id>1</id>
  <foo>dead</foo>
</row>
<row>
  <id>2</id>
  <foo>beef</foo>
</row>
This is nothing new and special (in the age of NO-SQL and document centric databases) and works well. If you go to use the SQL server as a data source in a business integration orchestration the XML representation of the SQL results turns the mapping of the data between different entities into a point and click game…
While playing with the example databases of Microsoft NAV I recognised some funny things.
UTF-16 conversion of column names
Some smart guy decided to use spaces and braces within the column names. To turn these column names into valid XML element names Microsoft decided to convert these characters into their UTF-16 representation surrounded by underscores. By applying this rule a column named ‚Ali Baba‘ will turn into ‚Ali_x0020_Baba‘. It turned out that the conversation is applied to nearly every special character used within column names:
<test.dbo.foo xmlns:colon="uri">
  <space_x0020_sign>1</space_x0020_sign>
  <exclamation_x0021_sign>1</exclamation_x0021_sign>
  <doublequote_x0022_sign>1</doublequote_x0022_sign>
  <hash_x0023_sign>1</hash_x0023_sign>
  <dollar_x0024_sign>1</dollar_x0024_sign>
  <percent_x0025_sign>1</percent_x0025_sign>
  <amp_x0026_sign>1</amp_x0026_sign>
  <singlequote_x0027_sign>1</singlequote_x0027_sign>
  <openparentheses_x0028_sign>1</openparentheses_x0028_sign>
  <closingparentheses_x0029_sign>1</closingparentheses_x0029_sign>
  <mul_x002A_sign>1</mul_x002A_sign>
  <plus_x002B_sign>1</plus_x002B_sign>
  <comma_x002C_sign>1</comma_x002C_sign>
  <minus-sign>1</minus-sign>
  <dot.sign>1</dot.sign>
  <slash_x002F_sign>1</slash_x002F_sign>
  <colon:sign>1</colon:sign>
  <semicolon_x003B_sign>1</semicolon_x003B_sign>
  <lesserthen_x003C_sign>1</lesserthen_x003C_sign>
  <equal_x003D_sign>1</equal_x003D_sign>
  <biggerthe_x003E_sign>1</biggerthe_x003E_sign>
  <questionmark_x003F_sign>1</questionmark_x003F_sign>
  <at_x0040_sign>1</at_x0040_sign>
  <backslash_x005C_sign>1</backslash_x005C_sign>
  <caret_x005E_sign>1</caret_x005E_sign>
  <underscore_sign>1</underscore_sign>
  <pipe_x007C_sign>1</pipe_x007C_sign>
  <opencurly_x007B_sign>1</opencurly_x007B_sign>
  <closingcurly_x007D_sign>1</closingcurly_x007D_sign>
  <tilde_x007E_sign>1</tilde_x007E_sign>
</test.dbo.foo>
This is a minor problem cause it just creates ugly element names. If the data is only exported (and no ‚translation‘ back in the database is needed), these encoded entities can be replaced with anything looking … better – like the underscore. This is just for cosmetic purposes – nothing a machine will take a notice of…
IF OBJECT_ID (N'dbo.cleanXMLElements', N'FN') IS NOT NULL
    DROP FUNCTION dbo.cleanXMLElements
GO

-- replace any occurence of _x00<VALUE@REPLACE>_ with the string given by the second argument
-- warning: this is a pure pattern matching - if the sequence _x00<VALUE@REPLACE>_ is part of your payload - good luck!
-- note: to increase performance - remove any values from @REPLACE not needed
-- param_0: xml document
-- param_1: replacement string
-- return: cleaned xml document
CREATE FUNCTION dbo.cleanXMLElements (@XMLDoc XML, @REPLACE_WIDTH VARCHAR(10))
RETURNS xml
AS
BEGIN
  DECLARE @XMLString NVARCHAR(MAX)
  DECLARE @REPLACE VARCHAR(100)
  -- hex-values of elements that should be replaced, match is done on _x00<value>_
  SET @REPLACE = '20,21,22,23,24,25,26,27,28,29,2a,2b,2c,2f,3b,3c,3d,3e,3f,40,5c,5e,7c,7b,7d,7e'
  SET @XMLString = CAST(@XMLDoc as NVARCHAR(MAX))

  WHILE LEN(@REPLACE) > 0
  BEGIN
    SET @XMLString = REPLACE(@XMLString, '_x00' + LEFT(@REPLACE, CHARINDEX(',', @REPLACE + ',')-1) + '_', @REPLACE_WIDTH)
    SET @REPLACE = STUFF(@REPLACE, 1, CHARINDEX(',', @REPLACE + ','), '')
  END
  RETURN CAST(@XMLString as XML)
END
GO
XML name spaces
If a column name contains a colon the XML export will fail:
>SELECT * FROM dbo.foo for XML AUTO, ELEMENTS, TYPE

Msg 6846, Level 16, State 1, Line 4
XML name space prefix 'colon' declaration is missing for FOR XML column name 'colon:sign'.
In XML the construct A:B defines B as an element living in the name space of A (here: sign is part of the name space colon). Since the generated XML representation lacks the needed name space definition so the document is not well formed…
Unhappily it is very likely that the colon is part of the values contained in the query/document so the simple approach to just replace/strip all colons is very error prone. It is also not possible to generate the name space definition on the fly (eg. by parsing the table definition). The only remaining solution for that kind of problem is to add the needed name space definition manually:
WITH XMLNAMESPACES ('uri' as colon)
SELECT * FROM dbo.foo for XML AUTO, ELEMENTS, TYPE
This eliminates the option to export large databases automatically – if there is a colon in a column name. Of course its still possible to generate the needed code…
invalid characters in XML document
Back to the NAV example database… I tried to insert the rows of the Item table as XML into another table (trigger based logging) – and the command failed caused by some illegal characters contained into the values of some fields (example):
USE test
GO

IF OBJECT_ID (N'dbo.log', N'U') IS NOT NULL
    DROP TABLE dbo.log
GO

CREATE TABLE dbo.log (
  id int IDENTITY(1,1),
  tab_name VARCHAR(20),
  data XML
);
GO
insert into dbo.log values('Item', (SELECT * FROM [Demo Database NAV (8-0)].[dbo].[CRONUS AG$Item] for xml raw, elements, BINARY BASE64))

Msg 9420, Level 16, State 1, Line 10
XML parsing: line 1, character 5458, illegal xml character
I dumped the XML and found  at the position given in the error message. The ASCII code 0x04 represents the special character EOT – End Of Transmission (I have no idea how the guy that created the example table was able to put that special char into the table data). Since 0x04 is not allowed in XML documents the conversion fails. Maybe I’m to demanding – but why the hell is the freaking tool that converts the SQL result to its XML representation not able to handle/filter that kind of special char? Hu? Have a look at http://www.w3.org/TR/xml/#charsets to get an idea what is allowed – and what not.
To workaround this misbehaviour just remove these illegal characters from the XML document before any further processing. Since the generated XML is not valid it is not possible to handover the converted SQL result directly to the sanitizer function so an explicit cast to nvarchar is needed here.
USE test
GO

IF OBJECT_ID (N'dbo.sanitizeXML', N'FN') IS NOT NULL
    DROP FUNCTION dbo.sanitizeXML
GO

-- remove any occurrence of &#x<VALUE@REMOVE>;
-- warning: this is a pure pattern matching - if the sequence &#x<VALUE@REMOVE> is part of your payload - good luck!
-- note: to increase performance - remove any values from @REMOVE not needed
-- param_0: text to be sanitized
-- return: sanitized string
--CREATE FUNCTION dbo.sanitizeXML (@XMLDoc XML)
CREATE FUNCTION dbo.sanitizeXML (@XMLString NVARCHAR(max))
RETURNS XML
AS
BEGIN
  --DECLARE @XMLString NVARCHAR(MAX)
  DECLARE @REMOVE VARCHAR(100)
  -- hex-values of elements that should be removed, match is done on &#x<value>;
  -- 0x05 -> ENQ
  -- 0x04 -> EOT
  -- full set: 00,01,02,03,04,05,06,07,08,0b,0c,0e,0f,10,11,12,13,14,15,16,17,18,19,1a,1b,1c,1d,1e,1f
  SET @REMOVE = '04,05'

  WHILE LEN(@REMOVE) > 0
  BEGIN
    SET @XMLString = REPLACE(@XMLString, '&#x' + LEFT(@REMOVE, CHARINDEX(',', @REMOVE + ',') - 1) + ';', '')
    SET @REMOVE = STUFF(@REMOVE, 1, CHARINDEX(',', @REMOVE + ','), '')
  END
  RETURN CAST(@XMLString as XML)
END
GO

insert into dbo.log (tab_name, data) values('Item', (select test.dbo.sanitizeXML(CAST((SELECT * FROM [Demo Database NAV (8-0)].[dbo].[CRONUS AG$Item] for xml raw, elements, BINARY BASE64) AS NVARCHAR(MAX)))))
For performance reasons the sanitizeXML currently only handles the special chars I have to deal with. In theory every char from 0x00 up to 0x1f (except 0x09, 0x0a, 0x0d) must be removed.
Scripts and examples: sanitize_and_cleanup_xml_sql.zip
24:
some background on how the update works
On startup the shine checks the external sdcard for some special files. If there is a file named update.zip, the system starts with /dev/block/mmcblk0p4 mounted as filesystem root – and /sbin/recovery is executed.
You can find the code that forms that little binary here.
_note: in the head section of recovery.cpp you can find a short outline on how update „notification“ works
First recovery checks the cryptographic signature of the update.zip by
- reading the public keys (yes, plural is possible – see load_keys in verifier.cpp) from /res/keys (stored in the recovery partition),
- creating the hash over the update.zip,
- extracting the signature embedded in the comment section,
- decrypt hash by using the public keys from /res/keys and
- compare own hash with hash from the signature.
After a successful verification of the update.zip the zip-container itself is opened and recovery checks for /META-INF/com/google/android/update-binary and – if it is present – executes it. The binary then starts running the script stored in /META-INF/com/google/android/updater-script that performs the installation steps. The script itself is written in edify – see here for a short overview.
_note: for hunting bugs during the update process cat /tmp/recovery.log
replace the key – old version / pre 1.2.4
Currently only the public key used by the Telekom is stored in the /res/keys-file. So only the owner of the private key – the Telekom – can create valid update-files (by signing them).
By replacing the public key in the shine by using the well-known testing key contained in the android sources everyone can create valid update files (and of course – you can re-sign the public update from the Telekom to use them too – if you want).
_note: you can find the keys here
First you must convert the key to the format the recovery expects. This is done by using the tool dumpkey – you can find the source here.
java -jar dumpkey.jar testkey.x509.pem > testkey.x509.c
gives you
{64,0xc926ad21,{1795090719,2141396315,950055447,-1713398866,-26044131,1920809988,546586521,-795969498,1776797858,-554906482,1805317999,1429410244,129622599,1422441418,1783893377,1222374759,-1731647369,323993566,28517732,609753416,1826472888,215237850,-33324596,-245884705,-1066504894,774857746,154822455,-1797768399,-1536767878,-1275951968,-1500189652,87251430,-1760039318,120774784,571297800,-599067824,-1815042109,-483341846,-893134306,-1900097649,-1027721089,950095497,555058928,414729973,1136544882,-1250377212,465547824,-236820568,-1563171242,1689838846,-404210357,1048029507,895090649,247140249,178744550,-747082073,-1129788053,109881576,-350362881,1044303212,-522594267,-1309816990,-557446364,-695002876},{-857949815,-510492167,-1494742324,-1208744608,251333580,2131931323,512774938,325948880,-1637480859,2102694287,-474399070,792812816,1026422502,2053275343,-1494078096,-1181380486,165549746,-21447327,-229719404,1902789247,772932719,-353118870,-642223187,216871947,-1130566647,1942378755,-298201445,1055777370,964047799,629391717,-2062222979,-384408304,191868569,-1536083459,-612150544,-1297252564,-1592438046,-724266841,-518093464,-370899750,-739277751,-1536141862,1323144535,61311905,1997411085,376844204,213777604,-217643712,9135381,1625809335,-1490225159,-1342673351,1117190829,-57654514,1825108855,-1281819325,1111251351,-1726129724,1684324211,-1773988491,367251975,810756730,-1941182952,1175080310}}
If your shine is already rooted, use your ADB shell and do the following:
# cd /mnt/sdcard
# mkdir mnt_recovery
# mount -t ext2 /dev/block/mmcblk0p4 mnt_recovery
# busybox cp mnt_recovery/res/keys mnt_recovery/res/keys.bck
# cat << 'EOF' > mnt_recovery/res/keys
{64,0xc926ad21,{1795090719,2141396315,950055447,-1713398866,-26044131,1920809988,546586521,-795969498,1776797858,-554906482,1805317999,1429410244,129622599,1422441418,1783893377,1222374759,-1731647369,323993566,28517732,609753416,1826472888,215237850,-33324596,-245884705,-1066504894,774857746,154822455,-1797768399,-1536767878,-1275951968,-1500189652,87251430,-1760039318,120774784,571297800,-599067824,-1815042109,-483341846,-893134306,-1900097649,-1027721089,950095497,555058928,414729973,1136544882,-1250377212,465547824,-236820568,-1563171242,1689838846,-404210357,1048029507,895090649,247140249,178744550,-747082073,-1129788053,109881576,-350362881,1044303212,-522594267,-1309816990,-557446364,-695002876},{-857949815,-510492167,-1494742324,-1208744608,251333580,2131931323,512774938,325948880,-1637480859,2102694287,-474399070,792812816,1026422502,2053275343,-1494078096,-1181380486,165549746,-21447327,-229719404,1902789247,772932719,-353118870,-642223187,216871947,-1130566647,1942378755,-298201445,1055777370,964047799,629391717,-2062222979,-384408304,191868569,-1536083459,-612150544,-1297252564,-1592438046,-724266841,-518093464,-370899750,-739277751,-1536141862,1323144535,61311905,1997411085,376844204,213777604,-217643712,9135381,1625809335,-1490225159,-1342673351,1117190829,-57654514,1825108855,-1281819325,1111251351,-1726129724,1684324211,-1773988491,367251975,810756730,-1941182952,1175080310}}
EOF
# sync
Of course – you can also add the testkey to the key already contained in the key file. Just run step 5 in the following color:
cat << 'EOF' >> mnt_recovery/res/keys
, {64,0xc926ad21,{1795090719,2141396315,950055447,-1713398866,-26044131,1920809988,546586521,-795969498,1776797858,-554906482,1805317999,1429410244,129622599,1422441418,1783893377,1222374759,-1731647369,323993566,28517732,609753416,1826472888,215237850,-33324596,-245884705,-1066504894,774857746,154822455,-1797768399,-1536767878,-1275951968,-1500189652,87251430,-1760039318,120774784,571297800,-599067824,-1815042109,-483341846,-893134306,-1900097649,-1027721089,950095497,555058928,414729973,1136544882,-1250377212,465547824,-236820568,-1563171242,1689838846,-404210357,1048029507,895090649,247140249,178744550,-747082073,-1129788053,109881576,-350362881,1044303212,-522594267,-1309816990,-557446364,-695002876},{-857949815,-510492167,-1494742324,-1208744608,251333580,2131931323,512774938,325948880,-1637480859,2102694287,-474399070,792812816,1026422502,2053275343,-1494078096,-1181380486,165549746,-21447327,-229719404,1902789247,772932719,-353118870,-642223187,216871947,-1130566647,1942378755,-298201445,1055777370,964047799,629391717,-2062222979,-384408304,191868569,-1536083459,-612150544,-1297252564,-1592438046,-724266841,-518093464,-370899750,-739277751,-1536141862,1323144535,61311905,1997411085,376844204,213777604,-217643712,9135381,1625809335,-1490225159,-1342673351,1117190829,-57654514,1825108855,-1281819325,1111251351,-1726129724,1684324211,-1773988491,367251975,810756730,-1941182952,1175080310}}
EOF
Note the comma surrounded by TWO spaces (SPACEKOMMASPACE) in front of the key (and the >> instead of > to append data). If you keep the Telekom key inside of the key-file you can install Telekom update-files without doing anything (but that contains the risk that the big magenta just kicks out the testkey – and locks the device finally).
_note: if you accidentally whipped out the Telekom key (as I did) – here is a backup:
{64,0x43e8c79d,{3676113227,1369749849,185223027,4193363093,2748936052,3982115949,2510941709,3179856730,3334762442,877424379,1572534478,379110109,3828184589,896326794,3259452337,1537333391,1527246812,1948881733,2695224641,3229564848,935338986,1880890185,1109044213,3584680280,2980215301,1048464167,1625211812,3380609409,1325015002,3048088550,3309007604,856748852,2742900622,1536007600,534693848,362616682,1757112249,1124497581,2589504072,3233109600,1483976042,1367799680,3874016522,3186374915,314458865,2533711827,917955710,2798363551,1533164771,21896696,577058097,4118697084,2950684889,1199785220,896256126,2013061576,3648332184,512726633,3829734369,3492448310,1658713944,2502792484,2381120692,2638223166},{2804200884,415193597,2952297320,1796440253,3760790861,2358398962,1319099071,1797194474,3920925071,3251309220,3091529551,3449146706,501734315,1726066195,2560662010,922451496,3625301210,3511962485,3446896765,2852859028,3995066542,3771896184,1498517695,1518271224,2813835315,2438495713,4214917633,1229593951,2879391816,2953200436,49762796,702148507,896186987,2106390057,3257996684,2916017064,2570034595,545791097,3544317144,1467421123,2340085279,3793830820,1463904638,2299616657,16368580,1993463273,20991070,1752616193,1008234173,2481181795,2499980873,904917164,906206298,2700276043,1728187988,1246428162,2078812943,732584325,881425958,3846779747,1384713822,2197399727,1513320059,731791506}}
If your shine is not rooted yet (and the serial number is below 20311241 – and you have not installed the update 1.2.4) you can just download the recovery.img.fixed_initrd_and_testkey, put it on a sdcard (!!!DO NOT FORGET TO RENAME IT TO recovery.img!!!) and restart your shine. On boot the shine starts to install the image in the background – so just wait (do nothing) till the reader goes down. Power it on again and your shine has ADB access and the testkey installed.
To sign an update.zip just run
java -jar signapk.jar -w testkey.x509.pem testkey.pk8 update.zip update_signed.zip
Then copy the update_signed.zip to your sdcard (and rename it to update.zip).
Example: update zip that just replaces the startup logo of the shine…
Intermezzo: The startup logo
The system/bin/upgrade.sh tells us that the logo lives in /dev/block/mmcblk0@18432 (bs=512). The name suggest that the image uses a 4 bit raw format – native resolution of the display is 1024×758 (makes 388096 bytes).
To prove that, I did a quick
dd if=/dev/block/mmcblk0 bs=1 skip=9437184 count=388096 of=raw_logo
Moved the file to my desktop and fired
cat raw_logo.org | convert -depth 4 -size 1024x758+0 gray:- pic.png
on it. Result:

Tolino Shine startup logo
_note: convert is part of imagemagic
After changing the image recreate the 4-bit-grayscale image with
convert logo_rework.png -size 1024x758+0 -depth 4 logo_rework.gray
Now write the raw image back to the shine using dd again:
dd if=logo_rework.gray of=/dev/block/mmcblk0 bs=1 seek=9437184
Reboot and enjoy your new startup logo!
back to the update example…
It just contains a short example of the META-INF/com/google/android/updater-script that invokes a one-liner shell script – nothing more.
ui_print("!!! this is only a demo !!!");
show_progress(0.05, 2);
assert(getprop("ro.product.device") == "imx50_rdp" || getprop("ro.build.product") == "imx50_rdp");
ui_print("Target device check: ok");
ui_print("use it for something usefull...");
show_progress(0.45, 90);
package_extract_file("install_logo.sh", "/tmp/install_logo.sh");
package_extract_file("logo.raw", "/tmp/logo.raw");
set_perm(0, 0, 0755, "/tmp/install_logo.sh");
set_perm(0, 0, 0555, "/tmp/logo.raw");
run_program("/tmp/install_logo.sh");
_note: never forget the empty newline at the end of the edify scripts!
_note: never forget to set proper permissions for your shell scripts!!
_note: never forget to add the bash bang on top of your shell scripts!!!
important_note: after installing 1.2.4 the shine reports itself as imx50_rdp_2 – so the above example must be adapted!!!
This update can be used to check if the testkey is installed.
the 1.2.4 update
I used the ability to sign my own update-packages to rework the latest update for the old shine. A rough overview of what I have done:
- add android testkey to all /res/keys
- add ADB on startup (hardcoded in upgrade_check.sh, /system/bin/adb)
- add su (/system/bin/su)
- fixes wrong waveform-target in upgrade_check.sh
- adds user_script.sh-hook in upgrade_check.sh
- re-enables recovery.img-hook in upgrade_check.sh
- add links to some tools (no need to write busybox in front of every important command)
- enable ADB in recovery
- added imx50_rdp_2 in the target test of the updater-script („big update“ can be installed over and over)
I used the update downloaded from Hugendubel. See the repack_and_sign.sh script in the downloads to get an idea on how it is done (trust me – its easy). To proceed for your own, just
- unpack the update.zip
- unpack the orig_update inside the update to orig_update
- replace META-INF/com/google/android/updater-script in update and orig_update by the ones used in the provided reworked
- replace all /res/keys-files to add testkey
- change the default.prop (secure = 0; debug=1, adb = 1)
- replace all upgrade_check.sh by provided one
- run pack_and_sign.sh…
_note: Watch the asserts inside of the updater-script. If they catch in the updater may tell misleading error messages. Just add verbose debug! And as noted above: have an eye to cat /tmp/recovery.log…
_note: tested by starting on a shine with 1.0.1 (rooted), installed recovery that brings the testkeys, than loaded the reworked 1.2.4 update…
the dead end – waveform.bin
Together with frank-w from the lesen.net-forum we discussed an upgrade-way over the waveform cause it is also written by upgrade_check.sh – without any checks:
...
elif [ -e /mnt/sdcard/extsd/waveform.bin ]; then
echo "---> Programming waveform ----------------------------------------"
busybox dd if=/mnt/sdcard/extsd/waveform.bin of=/dev/mmcblk0 bs=512 seek=14336
sync
...
Since the waveform binary is located in front of /mmcblk0p1 („MEIN TOLINO“) and – even more important – /mmcblk0p2 aka /system we had the idea to overwrite these two partitions by offering a waveform image that contains these parts. It sounded promising and worked on the console (directly on the shine – just dd the waveform + partition image). But on startup – the upgrade_check catches in and starts writing – the shine goes mad and killed all processes cause he runs out of memory… strange. But then, ohhhhh, that hurts so much: the actual device on the shine lives in /dev/block/mmcblk0 – but the upgrade_check writes to /dev/mmcblk0. And that is mounted via tmpfs. So on start – while writing to the NEW file /dev/mmcblk0 dd eats all the memory. Nice bug. Or was that intentional, Mr. big magenta? Huh?
left overs…
The process of changing the keys / building updates etc was not really straight forward. It took some hours of testing… here are some snippets that turned out to be useful…
If you wanna change the /system – remount rw:
mount -o remount,rw /dev/block/mmcblk0p2 /system
The su binary needs the set u-id permissions:
chmod 6555 /system/bin/su
Script that adds the testkeys in /mmcblk0p4/res/keys (recovery partition):
#!/system/bin/bash
mkdir /mnt/sdcard/recovery
mount -t ext2 /dev/block/mmcblk0p4 /mnt/sdcard/recovery
cp /mnt/sdcard/recovery/res/keys /mnt/sdcard/recovery/res/keys.org
echo " , {64,0xc926ad21,{1795090719,2141396315,950055447,-1713398866,-26044131,1920809988,546586521,-795969498,1776797858,-554906482,1805317999,1429410244,129622599,1422441418,1783893377,1222374759,-1731647369,323993566,28517732,609753416,1826472888,215237850,-33324596,-245884705,-1066504894,774857746,154822455,-1797768399,-1536767878,-1275951968,-1500189652,87251430,-1760039318,120774784,571297800,-599067824,-1815042109,-483341846,-893134306,-1900097649,-1027721089,950095497,555058928,414729973,1136544882,-1250377212,465547824,-236820568,-1563171242,1689838846,-404210357,1048029507,895090649,247140249,178744550,-747082073,-1129788053,109881576,-350362881,1044303212,-522594267,-1309816990,-557446364,-695002876},{-857949815,-510492167,-1494742324,-1208744608,251333580,2131931323,512774938,325948880,-1637480859,2102694287,-474399070,792812816,1026422502,2053275343,-1494078096,-1181380486,165549746,-21447327,-229719404,1902789247,772932719,-353118870,-642223187,216871947,-1130566647,1942378755,-298201445,1055777370,964047799,629391717,-2062222979,-384408304,191868569,-1536083459,-612150544,-1297252564,-1592438046,-724266841,-518093464,-370899750,-739277751,-1536141862,1323144535,61311905,1997411085,376844204,213777604,-217643712,9135381,1625809335,-1490225159,-1342673351,1117190829,-57654514,1825108855,-1281819325,1111251351,-1726129724,1684324211,-1773988491,367251975,810756730,-1941182952,1175080310}}" >>/mnt/sdcard/recovery/res/keys
sync
umount /mnt/sdcard/recovery/
Just put it on your external sd card, name it user_script.sh. If everything was okay, you will find the script (after restarting the shine) renamed to user_script.sh.success. If anything went wrong and the script does not return 0 the file becomes user_script.sh.failure.
If you miss some links to busybox tools:
nice_to_have="touch chgrp cp diff find vi nc pidof grep tar zip unzip wget du sed watch more arp seq sleep usleep tail head wc"; for tool in $nice_to_have ; do ln /system/bin/busybox /system/bin/$tool ; done
downloads
| file |
content |
size/mb |
md5 |
| part_one.zip |
- dumpkey.jar – output public key as c-source (used in res/keys)
- keys.telekom_and_testkey – /res/keys-file containing original and testkey
- mkkey.sh – old script from the Android repos to generate own keys
- recovery.img.fixed_initrd_and_testkey – Tolino recovery.img containing adb, root – and the testkey (but only the testkey – so you can install the reworked 1.2.4 update)
- signapk.jar – tool to sign apks / zips
- testkey.pk8 , testkey.x509.pem – the Android testkeys
- su, adbd – tolino binaries from old versions
- update_example_change_startlogo_signed_testkey.zip – update that was signed with the testkey, replaces the startlogo of the shine
- upgrade_check.sh – reworked upgrade_check
- updater-script – adds links for important tools, set su permissions, allows rdp and rdp_2
- blink.sh – just fade the backlight (to signal something is currently running)
- repack_and_sign.sh – automate packing and signing for 1.2.4
|
72 |
13362ef4bf5c73c9f9cfd0bd4f1628ce |
| update_hugendubel_1_2_4_reworked_testkey.zip |
- 1.2.4 update from hugendubel
- ADB + root
- original and testkey
- user_script install hook
- re-enabled recovery.img in upgrade_check
|
136 |
b80ed49bdb04685975bae414ade5d538 |
| shine_housing.zip |
detailed pictures of the plastic enclosure of the shine (in case you have to open it – note the noses around the border of the back part, the top cover is also glued to the display frame and the housing of the connectors at the bottom with double sided tape – lift it carefully and slowly. maybe some warm air from a hairdryer removes some adhesive power. but be careful to not overheat the display – stay cool at all) |
0.7 |
31f8869f0de1c1ee3b3f629a1698dc69 |
Have phun!
26:
I AM SO STUPID. I was looking for a way to exploit that little thingy by using some buffer overflow or some other coding mumbo jumbo… the hard way. And there is a script that writes the whole recovery image on the shine without any checks… the f*c**@! way. Telekom, sometimes I love you for your lack of… …and it gives us an open Tolino Shine WITHOUT the need of opening the device. Gotcha!
These are the lines I’m talking about (system/bin/upgrade_check.sh):
elif [ -e /mnt/sdcard/extsd/recovery.img ] || [ -e /cache/upgrade/recovery.img ]; then
    echo "---> Programming partition RECOVERY ----------------------------------"
    busybox dd if=/mnt/sdcard/extsd/recovery.img of=/dev/block/mmcblk0p4 bs=8M
    busybox dd if=/cache/upgrade/recovery.img of=/dev/block/mmcblk0p4 bs=8M
    sync
    sync
    e2fsck -dy /dev/block/mmcblk0p4
    sync
    sync
    mv /mnt/sdcard/extsd/recovery.img /mnt/sdcard/extsd/recovery.img_old
    rm /cache/upgrade/recovery.img
    sync
    sync
    am start -a android.intent.action.ACTION_REQUEST_SHUTDOWN
Yes. If there is a file recovery.img on your external SD card it is written to the shine. Without any check. Be careful! If you broke something the next step is to open your device to recover the SD image. If you boot the shine in recovery mode, mmcblk0p4 becomes the root-fs…
Kernel command line: console=ttymxc0 ... init=/init root=/dev/mmcblk0p4 ...
ADB (+root) is locked by init.rc and default.prop – inside of the initrd. So we must rewrite that part of the SD card.
What to prepare:
1. rework the initrd (uramdisk.img in the update.zip) so ADB is enabled
2. put the new initrd inside of the recovery.img
3. change the init.rc in the recovery.img so it writes a initrd to the SD card
How it works:
1. put the changed recovery.img on a external SD card, plug it into the shine
2. boot the shine – the recovery image is updated silently (after that the shine goes down)
3. boot while holding POWER&HOME
4. wait for END of the script – reboot
5. the shine is free.
Lets extract some data to play with… in /system/bin/upgrade.sh you find these lines:
dump_ramdisk(){
....
busybox dd if=/cache/upgrade/uramdisk.img of=/dev/block/mmcblk0 bs=1M seek=6
                sync
                sync
....
}
The initrd is expected to take place at 0x600000 on the SD card – the loader header starts at 0x5ffff0, containing the well known magic number (FF 5F AF FF) and the size information (0x23701 = 145153 bytes, size=uboot-header+image-data=64+145089). The initrd itself is encapsulated in a u-boot-header (note the magic number 27 05 19 56 at the beginning).
Get the initrd out of the backup-image:
>dd if=backup_internal_sd_shine_after_sys_recover.img of=initrd.uboot.img bs=1 skip=6291456 count=145153
>export PATH=$PATH:/home/devel/projects/tolino_shine/own_uboot/uboot-imx/tools/
>devel@bigplay:~/projects/tolino_shine/backup_tolino_sd$ mkimage -l initrd.uboot.img
Image Name:   ntxinitramfs
Created:      Tue Feb  5 06:38:45 2013
Image Type:   ARM Linux RAMDisk Image (uncompressed)
Data Size:    145089 Bytes = 141.69 kB = 0.14 MB
Load Address: 70308000
Entry Point:  70308000
Now we stript the u-boot header so we got the pure image file:
>dd if=initrd.uboot.img of=initrd.img bs=1 skip=64
The initrd.img is still compressed and packaged with cpio. To get the content of the ramdisk run
>mkdir initrd ; cd initrd
>zcat ../initrd.img | cpio -id
>ls
data          dev   init.freescale.rc  init.rc  sbin  system                ueventd.goldfish.rc
default.prop  init  init.goldfish.rc   proc     sys   ueventd.freescale.rc  ueventd.rc
Fire your favorite editor and change the following files:
****init.rc*****
service adbd /sbin/adbd
---      disabled
+++#     disabled
---------------------------
****default.prop****
---ro.secure=1
+++ro.secure=0
---ro.debuggable=0
+++ro.debuggable=1
---persist.service.adb.enable=0
+++persist.service.adb.enable=1
Repacking the initrd goes the other way around:
>find ./ | cpio -H newc -o > initrd.cpio.adb
>gzip initrd.cpio.adb
>mv initrd.cpio.adb.gz initrd.adb.img
_note: the new image is only 144858 bytes – 231 bytes smaller then the original.
Now add the u-boot header:
>mkimage -A arm -O linux -T ramdisk -C none -a 70308000 -e 70308000 -n "Tolino+ADB" -d initrd.adb.img initrd.adb.img.uboot
Image Name:   Tolino+ADB
Created:      Wed Jun 26 12:02:02 2013
Image Type:   ARM Linux RAMDisk Image (uncompressed)
Data Size:    144858 Bytes = 141.46 kB = 0.14 MB
Load Address: 70308000
Entry Point:  70308000
Half way done. Now lets write that new initrd to the SD card to check if ADB is enabled after boot…
#>dd if=initrd.adb.img.uboot of=/dev/SDCARD bs=512 seek=12288
_note: seek=12288*512=6291456=0x600000
After power on start ADB shell and be happy:
devel> adb devices
List of devices attached
20030394  device
-
devel> adb shell
# id
uid=0(root) gid=0(root)
#
The images:
Yes, now we have ADB as root. But replacing the initrd this way that is only possible if you open the Shine… not good. But by the power of the recovery.img we will solve that problem. First get the partition that holds the recovery image. After having some trouble using kpartx and dd from the loops/mappings I decided to go the good old way…
#>sudo fdisk /dev/sdb
.....
Command (m for help): p
.....
   Device Boot      Start         End      Blocks   Id  System
.....
/dev/sdb4         7185411     7709699      262144+  83  Linux
.....
_note: 7709699-7185411=524288 -> *512 (block size) = 268435456 bytes
>mkdir recovery; cd recovery
#>dd if=/dev/sdb of=recovery.img bs=512 count=524288 skip=7185411
Make a copy to keep the original file. If everything is okay we could mount it…
>mkdir recoverymnt
>cp recovery.img recovery.img.initrd
#>mount -o loop recovery.img.initrd recoverymnt
>cd recoverymnt
Now copy the initrd with enabled ADB into the recovery image and add a line in the init.rc script (before the line that contains service recovery /sbin/recovery):
#>cp ../../initrd/initrd.adb.img.uboot .
#>nano init.rc
---service recovery /sbin/recovery
+++service adbroot replace_initrd.sh
+++   oneshot
+++
+++service recovery /sbin/recovery
_note: documentation of android init script syntax: readme.txt
Next step: add a little script that does the replacement job for us (and make it executable):
#>nano replace_initrd.sh
+++#!/system/bin/bash
+++if [ -e initrd.adb.img.uboot ] ; then
+++busybox echo "replace initrd with given image... this may take some seconds."
+++busybox dd if=initrd.adb.img.uboot of=/dev/block/mmcblk0 bs=512 seek=12288
+++busybox sync
+++busybox rm initrd.adb.img.uboot
+++busybox echo "initrd replaced. Reboot device and enjoy ADB+root!"
+++fi
#>chmod a+x replace_initrd.sh
Finally unmount the recovery-image and run a sanity check:
>cd ..
>sync
#>umount recoverymnt
>fsck.ext4 recovery.img.initrd
e2fsck 1.42.5 (29-Jul-2012)
recovery: clean, 420/65536 files, 109353/262144 blocks
Now place the recovery.img.initrd on a micro SD card, plug the card inside the Tolino and boot.
_note: remember to rename the recovery.img.initrd to recovery.img and do a sync before pulling the card
The copy process for the recovery.img starts and runs in the background – do not try to do something useful with the device during the (hidden) copy process – it will hang. After the copy is done the scripts causes a shutdown. This basically means: plug the card into the shine, start it and wait till it is off again.
Now start the shine in recovery mode by pressing the HOME and POWER button together… and the magic happens as soon as init.rc is executed… wait till the shine asks you to restart or reset the device and reboot. Now ADB (as root) is enabled – persistent.
Here you can download the recovery images I used. Attention: use them on your own risk. I’m not responsible if you brick your device (but I can give you advices how to open it). If something is fuXXed up: I am not responsible! (Maybe someone else with an already opened shine should try that first, and again, and again…)
Have fun!
